Best Security Practices in Angular Applications – Part 2
Introduction
Error management reduces the risk of leak of crucial information to users. Centralized logging provides efficient monitoring, debugging, and forensic analysis. In angular applications nowadays, secure logging and robust error handling are required to maintain the stability, making the detection of security threats and user data's protection in angular application. Angular has some built-in protections from vulnerabilities attacks in web-application like XSS, input validation and Sanitization.
Prerequisites
Before we begin, ensure Node.js and Angular CLI is installed.
Step 1: Create a new angular application
Run the following command to generate a new Angular app and use strict flag to reduce security mistakes and improve type safety.
Run ‘ng new best-security-practices --strict ‘
Note: During setup, choose the default configuration (no routing, CSS for styling, unless otherwise needed).
To open directory run change directory command
Run ‘cd best-security-practices‘
After creation serve the project using command
Run ‘npm start or ng serve’
Step 2: Remove the Default App Content
By default, Angular includes sample HTML in the AppComponent. To prepare for a routed layout:
- Open app.component.ts.
- Replace the existing template code with the following:
<router-outlet></router-outlet>
This enables Angular’s router to display components based on the current route.
Step 3: Generate Project Components
Use Angular CLI commands to scaffold the necessary components. Open a terminal in your project directory and run the following:
Run ‘ng g c layout’
Run ‘ng g c layout/header’
Run ‘ng g c layout/footer’
These components will be used to structure your application page and layout.
Now create components for login and page-not-found page. And Components for home, about, dashboard in user directory.
Run ‘ng g c login’
Run ‘ng g c page-not-found’
Run ‘ng g c user/home’
Run ‘ng g c user/about’
Run ‘ng g c user/dashboard’
Step 4: Configure Application Routing
Update your app.routes.ts file to define application routes by implementing nested routes.
import { Routes } from '@angular/router';
import { LayoutComponent } from './layout/layout.component';
import { HomeComponent } from './user/home/home.component';
import { DashboardComponent } from './user/dashboard/dashboard.component';
import { PageNotFoundComponent } from './page-not-found/page-not-found.component';
import { LoginComponent } from './login/login.component';
import { AboutComponent } from './user/about/about.component';
export const routes: Routes = [
    {path:'', redirectTo:'/user/home', pathMatch:'full'},
    {path:'user', component:LayoutComponent, children:[
        {path:'home', component:HomeComponent},
        {path:'about', component:AboutComponent},
        {path:'dashboard', component:DashboardComponent}
    ]},
    {path:'login', component:LoginComponent},
    {path:'**', component:PageNotFoundComponent}
];
Step 5: Add Bootstrap CDN Links
Add Bootstrap v5.3 using CDN links add these tags to attach css and javascript bundle files in index.html.
<!doctype html>
<html lang="en">
<head>
  <meta charset="utf-8">
  <title>BestSecurityPractices</title>
  <base href="/">
  <meta name="viewport" content="width=device-width, initial-scale=1">
  <link rel="icon" type="image/x-icon" href="favicon.ico">
  <link href="https://cdn.jsdelivr.net/npm/bootstrap@5.3.7/dist/css/bootstrap.min.css" rel="stylesheet" integrity="sha384-LN+7fdVzj6u52u30Kp6M/trliBMCMKTyK833zpbD+pXdCLuTusPj697FH4R/5mcr" crossorigin="anonymous">
  <link rel="stylesheet" href="https://cdn.jsdelivr.net/npm/bootstrap-icons@1.13.1/font/bootstrap-icons.min.css">
</head>
<body>
  <app-root></app-root>
  <script src="https://cdn.jsdelivr.net/npm/bootstrap@5.3.7/dist/js/bootstrap.bundle.min.js" integrity="sha384-ndDqU0Gzau9qJ1lfW4pNLlhNTkCfHzAVBReH9diLvGRem5+R9g2FzA8ZGN954O5Q" crossorigin="anonymous"></script>
</body>
</html>
Step 6: Creating the design layout
Now let’s start working on the layout design of the project in layout.component.html. Add component selector of header component and footer component and router-outlet.
In the layout component add the class HeaderComponent, FooterComponent and RouterOutlet in the imports array.
<app-header></app-header>
<router-outlet></router-outlet>
<app-footer></app-footer>
Let’ add in the header component, a navbar is created with links for home, about and login page. Also, add Routerlink in the imports array in header.component.ts.
<nav class="navbar navbar-expand-lg bg-body-tertiary">
  <div class="container">
    <a class="navbar-brand" routerLink="/user/home">Project</a>
    <button class="navbar-toggler" type="button" data-bs-toggle="collapse" data-bs-target="#navbarSupportedContent"
      aria-controls="navbarSupportedContent" aria-expanded="false" aria-label="Toggle navigation">
      <span class="navbar-toggler-icon"></span>
    </button>
    <div class="collapse navbar-collapse" id="navbarSupportedContent">
      <ul class="navbar-nav me-auto mb-2 mb-lg-0">
        <li class="nav-item">
          <a class="nav-link" aria-current="page" routerLink="/user/home" routerLinkActive="active">Home</a>
        </li>
        <li class="nav-item">
          <a class="nav-link" routerLink="/user/about" routerLinkActive="active">About</a>
        </li>
      </ul>
      <div class="d-flex">
 <button class="btn btn-outline-primary" type="button" routerLink="/login">Login</button>
      </div>
    </div>
  </div>
</nav>
Next is the home component, Create a banner for the project in the home.component.html
<div class="home">
    <div class="container">
        <div class="row">
            <div class="col-lg-6">
                <p class="fs-1 fw-bold">Best Practices for securing Angular Application</p>
                <button class="btn btn-outline-primary" routerLink="/user/about">Get Started</button>
            </div>
        </div>
    </div>
</div>
Add this to home.component.css to add styling.
.home{
    padding: 100px 0;
    background-image: url(/images/1.jpg);
    background-repeat: no-repeat;
    background-size: cover;
}
Next is add a card in the footer component, in footer.component.html. Add Class RouterLink in the imports array.
<div class="card text-center">
  <div class="card-header">
    <div class="container">
      Error management reduces the risk of leak of crucial information to users. Centralized logging provides efficient monitoring, debugging, and forensic analysis. In angular applications nowadays, secure logging and robust error handling are required to maintain the stability, making the detection of security threats and user data's protection in angular application. Angular has some built-in protections from vulnerabilities attacks in web-application like XSS, input validation and Sanitization.
    </div>
  </div>
  <div class="card-body">
    <h5 class="card-title">Best Security Practices</h5>
    <p class="card-text">Different practices and strategies are available to secure the angular application.</p>
    <a routerLink="/login" class="btn btn-primary">Login</a>
  </div>
  <div class="card-footer text-body-secondary">
    <i class="bi bi-c-circle"></i> Copyrights
  </div>
</div>
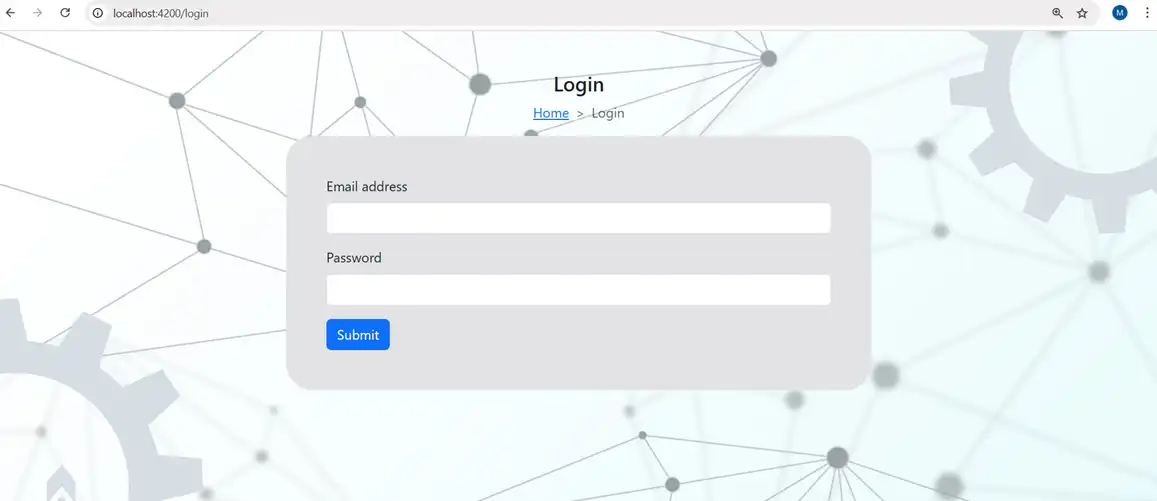
Create a form in the login component. Add this code in login.component.html and add class RouterLink in the imports array in login.component.ts
<div class="login py-5">
    <div class="container-fluid">
        <div class="row">
            <div class="col-12">
                <h4 class="text-center">Login</h4>
                <nav style="--bs-breadcrumb-divider: '>';" class="" aria-label="breadcrumb">
                    <ol class="breadcrumb justify-content-center">
                        <li class="breadcrumb-item"><a routerLink="/user/home">Home</a></li>
                        <li class="breadcrumb-item active" aria-current="page">Login</li>
                    </ol>
                </nav>
            </div>
            <div class="col-md-3"></div>
            <div class="col-md-6 p-5 bg-secondary-subtle rounded-5">
                <form>
                    <div class="mb-3">
                        <label for="exampleInputEmail1" class="form-label">Email address</label>
                        <input type="email" class="form-control" id="exampleInputEmail1" aria-describedby="emailHelp"
                            formControlName="email">
                    </div>
                    <div class="mb-3">
                        <label for="exampleInputPassword1" class="form-label">Password</label>
                        <input type="password" class="form-control" id="exampleInputPassword1"
                            formControlName="password">
                    </div>
                    <button type="submit" class="btn btn-primary" >Submit</button>
                </form>
            </div>
            <div class="col-md-3"></div>
        </div>
    </div>
</div>
Add this styling for login form in login.component.css.
.login{
    height: 100vh;
    background-image: url(/images/1.jpg);
    background-repeat: no-repeat;
    background-size: cover;
}
The preview of login page is as follows:
Step 7: Securing Practices for Angular App
Securing an angular app with the best practices are mentioned below.
- Input Validation: User input should be validated to check that it follows anticipated formats and does not include any dangerous code.Checking of invalid and special characters are examples of this by using min, max, minLength, maxLength, pattern etc like validators.
- XSS and Sanitization: To sanitize user input before displaying it by removing harmful parts from the input. To implement this, angular contains built-in sanitization functions such as bypassSecurityTrustHtml() and bypassSecurityTrustUrl().
- Authentication: Securing routes for which login is required, like admin panels or user pages.
- Authorization: To maintain control on user roles or permissions. For example only admins have access to specific pages.
- Prevent CSRF (Cross-site request forgery): A security flaw by which an attacker makes changes in a user's browser to make requests that are unauthorized to steal sensitive information and do the modifications.
- CSP: To prevent XSS and other injection vulnerabilities in web applications. By providing which resources the browser can load, as CSP adds a defensive layer in angular app.
Step 8: Input Validation
To ensure that data meets the rules for inputs, validations are added to code. Here validation is added to login form created using reactive form and validators in it, a custom password regex is used as pattern validator. First in login.component.ts reactive form with validation by importing ReactiveFormsModule and NgIf in imports array. Create a function named loginFun to login form submission.
loginForm = new FormGroup({
    email:new FormControl("", [Validators.required, Validators.email]),
    password:new FormControl("", [Validators.required, Validators.pattern(/^(?=[^A-Z]*[A-Z])(?=[^a-z]*[a-z])(?=\D*\d).{8,}$/)])
  })
loginFun(){}
Changes in form in login.component.html are as follows
<form [formGroup]="loginForm" (submit)="loginFun()">
     <div class="mb-3">
          <label for="exampleInputEmail1" class="form-label">Email address</label>
          <input type="email" class="form-control" id="exampleInputEmail1" aria-describedby="emailHelp" formControlName="email">
          @if(loginForm.controls['email'].touched && loginForm.controls['email'].errors?.['required']){
               <div class="form-text text-danger">Email is required</div>
          }
          @if(loginForm.controls['email'].touched && loginForm.controls['email'].errors?.['email']){
               <div class="form-text text-danger">Invalid Email</div>
          }
     </div>
     <div class="mb-3">
          <label for="exampleInputPassword1" class="form-label">Password</label>
          <input type="password" class="form-control" id="exampleInputPassword1" formControlName="password">
          @if(loginForm.controls['password'].touched && loginForm.controls['password'].errors?.['required']){
               <div class="form-text text-danger">Password is required</div>
          }
          @if(loginForm.controls['password'].touched && loginForm.controls['password'].errors?.['pattern']){
               <div class="form-text text-danger">Invalid Password ( Password should have a minimum 8 characters, at least one uppercase letter, one lowercase letter, one number and one special character )</div>
          }
     </div>
     <button type="submit" class="btn btn-primary" [disabled]="loginForm.invalid">Submit</button>
</form>
Step 9: Authentication
To perform authentication using login form let’s create an auth service first and create functions for login to store token and user details in session storage, logout to navigate and clear the session storage. A getToken function which returns the token. A getRole that returns the role.
Run this command to create an auth service.
Run ‘ng g s services/auth’
Also install ngx-toastr to the project to show popup messages to users
Add the provider for toasts and animations in app.config.ts
providers: [
    provideZoneChangeDetection({ eventCoalescing: true }),
    provideRouter(routes),
    provideAnimations(),
    provideToastr({
      preventDuplicates:true,
      positionClass:'toast-bottom-center'
    })
  ]
In angular.json add the css path and restart the app.
"styles": [
    "src/styles.css",
         "node_modules/ngx-toastr/toastr.css"
],
Add this code in auth.service.ts
import { Injectable } from '@angular/core';
import { Router } from '@angular/router';
import { ToastrService } from 'ngx-toastr';
@Injectable({
  providedIn: 'root'
})
export class AuthService {
  constructor(private router:Router, private toastr:ToastrService) { }
  login(info:any){
    sessionStorage.setItem('token', 'true')
    sessionStorage.setItem('email', info.email)
    sessionStorage.setItem('name', info.name)
    sessionStorage.setItem('role', info.role)
    this.router.navigateByUrl('/user/home')
  }
  logout(){
    sessionStorage.clear()
    this.router.navigateByUrl('/login')
    this.toastr.success("Logged out successfully")
  }
  getToken(){
    return sessionStorage.getItem('token')
  }
  getRole(){
    return sessionStorage.getItem('role')
  }
}
Create an instance of auth service in login.component.ts and use it in the login function. Email and Password will be matched using a comparison operator.
constructor(private auth:AuthService, private toastr:ToastrService){
  loginFun(){
    let credentials = this.loginForm.value
    if(credentials.email == 'user@gmail.com' && credentials.password == 'Qwerty@123'){
      let info:any = {
        email:credentials.email,
        name:'John',
        role:'user'
      }
      this.auth.login(info)
      this.toastr.success("Login Successful")
    }
    else{
      this.toastr.error("Incorrect Credentials")
    }
 }
Next is to add functionality after login in the header. In header.component.html add a button for logout and a dropdown in case the user is logged in to show pages like dashboard and other functionality which is only shown after login. After logout hide this drop down and logout button.
<div class="d-flex">
        @if (isLoggedIn) {
          <div class="dropdown">
            <button class="btn btn-primary dropdown-toggle me-4" type="button" data-bs-toggle="dropdown"
              aria-expanded="false">
              {{name}}
            </button>
            <ul class="dropdown-menu">
              <li><a class="dropdown-item" routerLink="/user/dashboard">Dashboard</a></li>
              <li><a class="dropdown-item" routerLink="">Action Center</a></li>
              <li><a class="dropdown-item" routerLink="">Manage Passwords</a></li>
            </ul>
          </div>
        }
        @if(isLoggedIn){
        <button class="btn btn-outline-primary" type="button" (click)="logout()">Logout</button>
        }
        @else{
        <button class="btn btn-outline-primary" type="button" routerLink="/login">Login</button>}
</div>
In header.component.ts a flag is added isLoggedIn to check if the user is logged in or not and show the login or logout button accordingly. The name variable to show the user's name on the dropdown. A logout function.
name:string = ''
  isLoggedIn:boolean = false
  constructor(private auth:AuthService){}
  ngOnInit(): void {
    if(!!this.auth.getToken()){
      this.isLoggedIn = true
      this.name = sessionStorage.getItem('name') ?? ''
    }
    else{
      this.name = ""
      this.isLoggedIn = false
    }
  }
  logout(){
    this.auth.logout()
 }
Step 10: Authorization
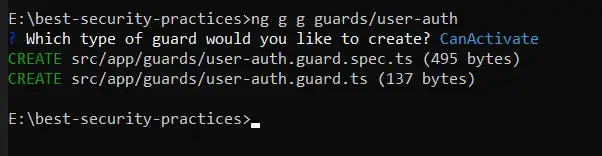
The dashboard page is not shown if the user has not logged in and after logout. But it can be accessed using routes, to authorise some functionality only to authenticated users we can implement roles and route guards. By this we can protect routes for admin and restricted roles. Guards canActivate, canLoad, canActivateChild can be used. Avoid exposing sensitive data view route parameters. For that create a route guard using the command
Run ‘ng g g guards/user-auth’
Choose CanActivate guard to be created.
Add the code in user-auth.guard.ts
import { inject } from '@angular/core';
import { CanActivateFn, Router } from '@angular/router';
import { AuthService } from '../services/auth.service';
export const userAuthGuard: CanActivateFn = (route, state) => {
  let auth = inject(AuthService)
  let router = inject(Router)
  if(!!auth.getToken() && auth.getRole()=='user'){
    return true;
  }
  else{
    router.navigateByUrl('/user/home')
    return false
  }
};
Use this guard in app.routes.ts to protect the pages
{path:'user', component:LayoutComponent, children:[
     {path:'home', component:HomeComponent},
     {path:'about', component:AboutComponent},
     {path:'dashboard', component:DashboardComponent, canActivate:[userAuthGuard]}
]},
Step 11: Preventing XSS and Sanitization
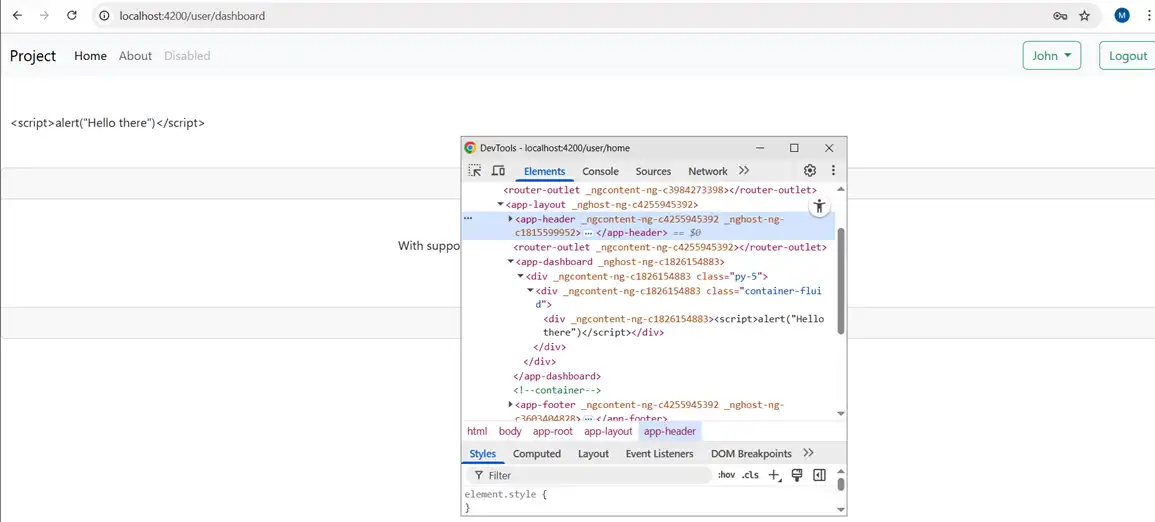
Attackers can add malicious code from entering DOM and steal user login information using cross-site scripting by adding script tag into user input, onerror in img tag and href in anchor tag. Angular treats all values untrusted and are sanitized on entering DOM using template binding. Let’s see how to implement built-in sanitization techniques in angular. Here are the examples.
Here in interpolation the content is escaped and the browser displays angle brackets as text. Binding into a value that an attacker can add causes XSS vulnerability. Avoid using innerHTML and be careful while using third-party libraries and check dynamic style or class bindings for user-controlled input.
<div class="py-5">
    <div class="container">
        <div  class="my-3">{{alertMessage}}</div>
    </div>
</div>
  alertMessage: any
  constructor() {
    this.alertMessage = '<script>alert("Hello there")</script>'
 }
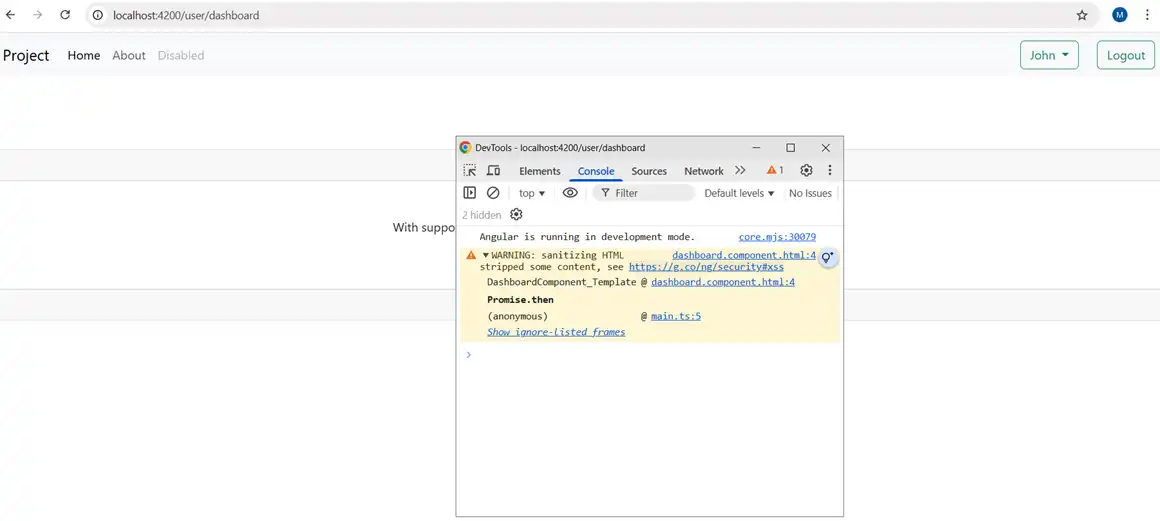
Avoid innerHTML and use angular’s data binding. Do not trust user input , validate it and use DomSanitizer for sanitizing.
<div class="py-5">
    <div class="container">
      <!-- <div  class="my-3"> {{alertMessage}}</div>  -->
       <div  class="my-3" [innerHTML]="alertMessage"> </div>
    </div>
</div>
For sanitizing text, from methods of DomSanitizer, bypassSecurityTrustHtml can be used.
<div class="py-5">
<div class="container">
<!-- <div class="my-3">{{alertMessage}}</div> -->
<!-- <div class="my-3" [innerHTML]="alertMessage"> </div> -->
<div class="my-3" [innerHTML]="safeText"></div>
</div>
</div>
alertMessage: any
safeText: SafeHtml
 constructor(private sanitizer: DomSanitizer) {
   this.alertMessage = '<script>alert("Hello there")</script>'
   this.safeText = sanitizer.bypassSecurityTrustHtml(this.alertMessage)
}
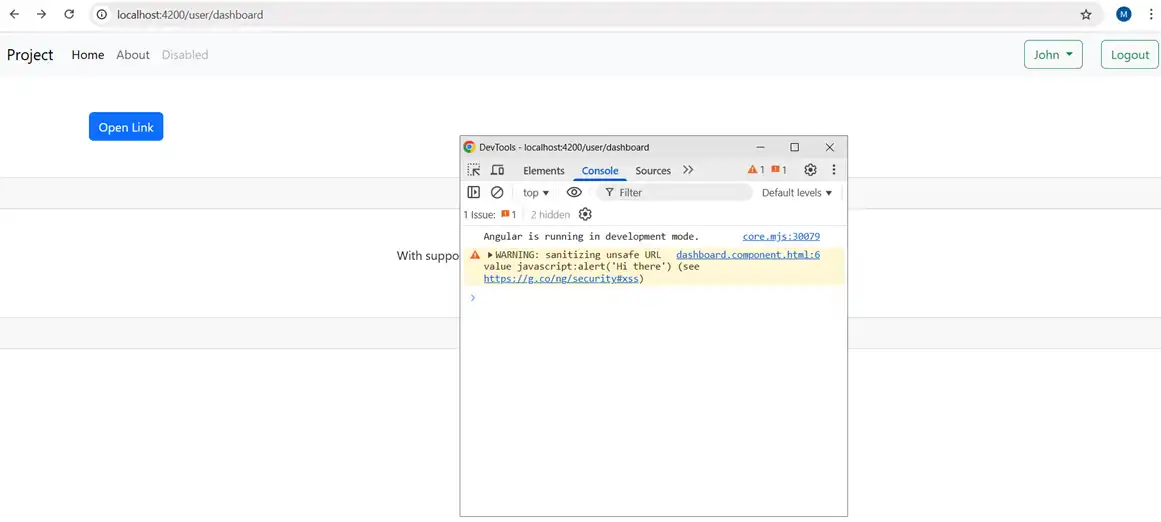
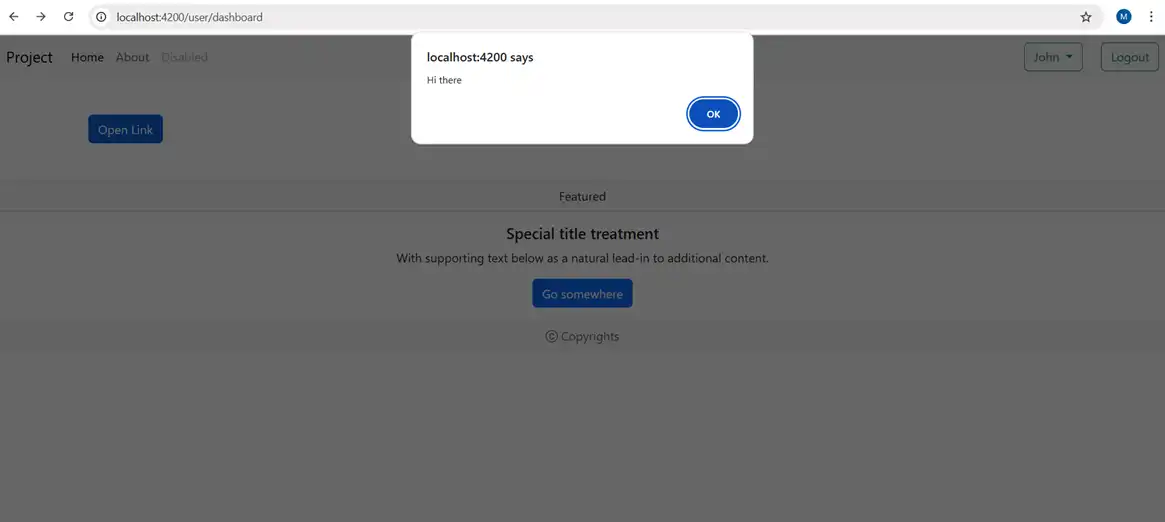
Hyperlinks: As angular automatically sanitizes the URL and disables dangerous code and logs errors in code, to remove this URL can be used with bypassSecurityTrustUrl can be used.
<div class="py-5">
<div class="container">
<div class="my-3">
<!-- <a class="btn btn-primary" [href]="href"> Open Alert</a> -->
<a class="btn btn-primary" [href]="safeUrl">Open Alert</a>
</div>
</div>
</div>
href: any
safeUrl: SafeUrl
constructor(private sanitizer: DomSanitizer) {
this.href = "javascript:alert('Hello there')"
this.safeUrl = sanitizer.bypassSecurityTrustUrl(this.href)
}
This is how it works
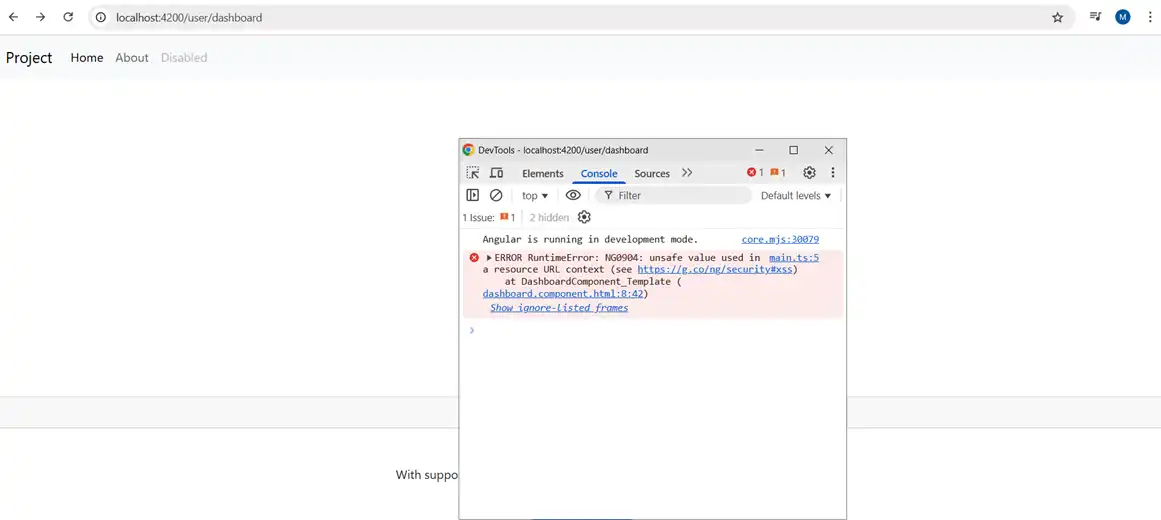
Resource Url: Here an untrusted can smuggle in file downloads that unsuspecting users can run.
<div class="py-5">
    <div class="container">
        <div class="my-3">
            <!-- <iframe width="560" height="315" [src]="videoSrc" title="YouTube video player" frameborder="0" allow="accelerometer; autoplay; clipboard-write; encrypted-media; gyroscope; picture-in-picture; web-share" referrerpolicy="strict-origin-when-cross-origin" allowfullscreen></iframe>  -->
            <iframe width="560" height="315" [src]="safeVideoSrc" title="YouTube video player" frameborder="0"
                allow="accelerometer; autoplay; clipboard-write; encrypted-media; gyroscope; picture-in-picture; web-share"
                referrerpolicy="strict-origin-when-cross-origin" allowfullscreen></iframe>
        </div>
    </div>
</div>
videoSrc: any
safeVideoSrc: SafeResourceUrl
constructor(private sanitizer: DomSanitizer) {
    this.videoSrc = "https://www.youtube.com/embed/FpivELteI-0?si=PI1-HJRkuuTD29H6"
    this.safeVideoSrc = sanitizer.bypassSecurityTrustResourceUrl(this.videoSrc)
 }
Step 12: HTTPS
It is necessary to use HTTPS for API calls. Validate and sanitize input on the server. Use Angular built-in HttpClient with interceptors for token management. Also for the server, set proper CORS policies.
Create Interceptor named auth using the command
Run ‘ng g interceptor interceptors/auth’
Add this into the code
import { HttpInterceptorFn } from '@angular/common/http';
import { inject } from '@angular/core';
import { AuthService } from '../services/auth.service';
export const authInterceptor: HttpInterceptorFn = (req, next) => {
  let auth:any = inject(AuthService)
  let token = auth.getToken()
  if(token){
    req = req.clone({
      headers:req.headers.set('Authorization', `Bearer ${token}`)
    })
  }
  return next(req);
};
Add the provider for interceptor
provideHttpClient(
    withInterceptors([authInterceptor]),
),
Create a dashboard service using the following command and create a function getDashboard which calls an API using HttpClient.
import { HttpClient } from '@angular/common/http';
import { Injectable } from '@angular/core';
@Injectable({
  providedIn: 'root'
})
export class DashboardService {
  constructor(private http:HttpClient) { }
  getDashboard(){
    return this.http.get('/api/getDashboard')
  }
}
Step 13: Cross-Site Request Forgery (CSRF) Protection
Cross-Site Request Forgery means for example an attacker tricks your logged-in user’s browser to send a request (like “delete account”, “transfer money”) to your server, re-using the user’s credentials (cookies) without the user’s consent.
Angular itself doesn’t generate CSRF tokens because that’s a server concernCS RF can be handled by enabling server-side CSRF tokens.
provideHttpClient(
    withInterceptors([authInterceptor]),
    withXsrfConfiguration({
    cookieName: 'XSRF-TOKEN',
	headerName: 'X-XSRF-TOKEN'
   })
 ),
Step 14: Content Security Policy (CSP)
Content Security Policy (CSP) is an HTTP response header that tells the browser what scripts are allowed to run, what styles can be loaded and what images can be loaded. It is the single strongest defense against XSS. CSP protects you before any JavaScript is parsed.
Step 15: Error handling
Create error handler in angular application by creating a file named error-handler.ts in app/handler directory.
import { ErrorHandler, Injectable } from '@angular/core';
@Injectable()
export class errorHandler implements ErrorHandler {
  handleError(error: any): void {
    console.log("Error occurred =", error)
    alert("Something went wrong, Try Again")
  }
}
Add its provider in app.config.ts
{provide:ErrorHandler, useClass:errorHandler},
In Dashboard Component create a function getData and create instance of Dashboard Service and a variable named errorMessage
getData() {
   this._dashboard.getDashboard().subscribe({
	 next: (data:any) => { /* handle success */ },
	 error: () => {
		this.errorMessage = "Some error occurred. Please try again later.";
     }
   });
}
Conclusion
By combining all these practices to safe the userdata by authentication, authorization, using HTTPS for encrypting communication, sanitizing user inputs, robust CSP, we can create the angular application would be consistent in error handling for all features, will have minimal exposure to sensitive technical information, a mechanism to analyze errors used to proactively protect the angular application.