Microservices architecture enables building applications as a collection of loosely coupled, independently deployable services. In this project, we will implement NestJS microservices and use Redis as a message broker to handle communication between services.
This setup demonstrates both request–response and event-driven messaging patterns, ensuring that services remain independent, scalable, and easy to maintain. Using Redis simplifies message passing while providing a lightweight and fast solution for microservices communication.
What is Redis?
Redis is an open-source, in-memory data structure store that can function as a database, cache, and message broker. It is widely used in modern applications for its speed and simplicity.
Key Features
Extremely fast and lightweight – ideal for real-time applications
Supports Pub/Sub messaging – perfect for communication between microservices
In-memory storage with optional persistence – ensures high performance while retaining data durability
Easy to install and use – minimal setup required for development and production
Redis is especially useful in microservices architectures for event-driven communication, caching frequently accessed data, and handling lightweight message queues.
Why Use Redis in Microservices?
Using Redis as a message broker provides several benefits:
Lightweight & fast – minimal latency between services
Easy local setup – no complex infrastructure required
Built-in NestJS support – simplifies microservice creation
Flexible communication patterns – supports both request-response and event-based messaging
Loose coupling – services remain independent; failure of one does not crash others
Note: Redis is simpler than Kafka and not as durable. It's perfect for learning, prototypes, and many real-world apps where high durability is not critical.
What We Will Build
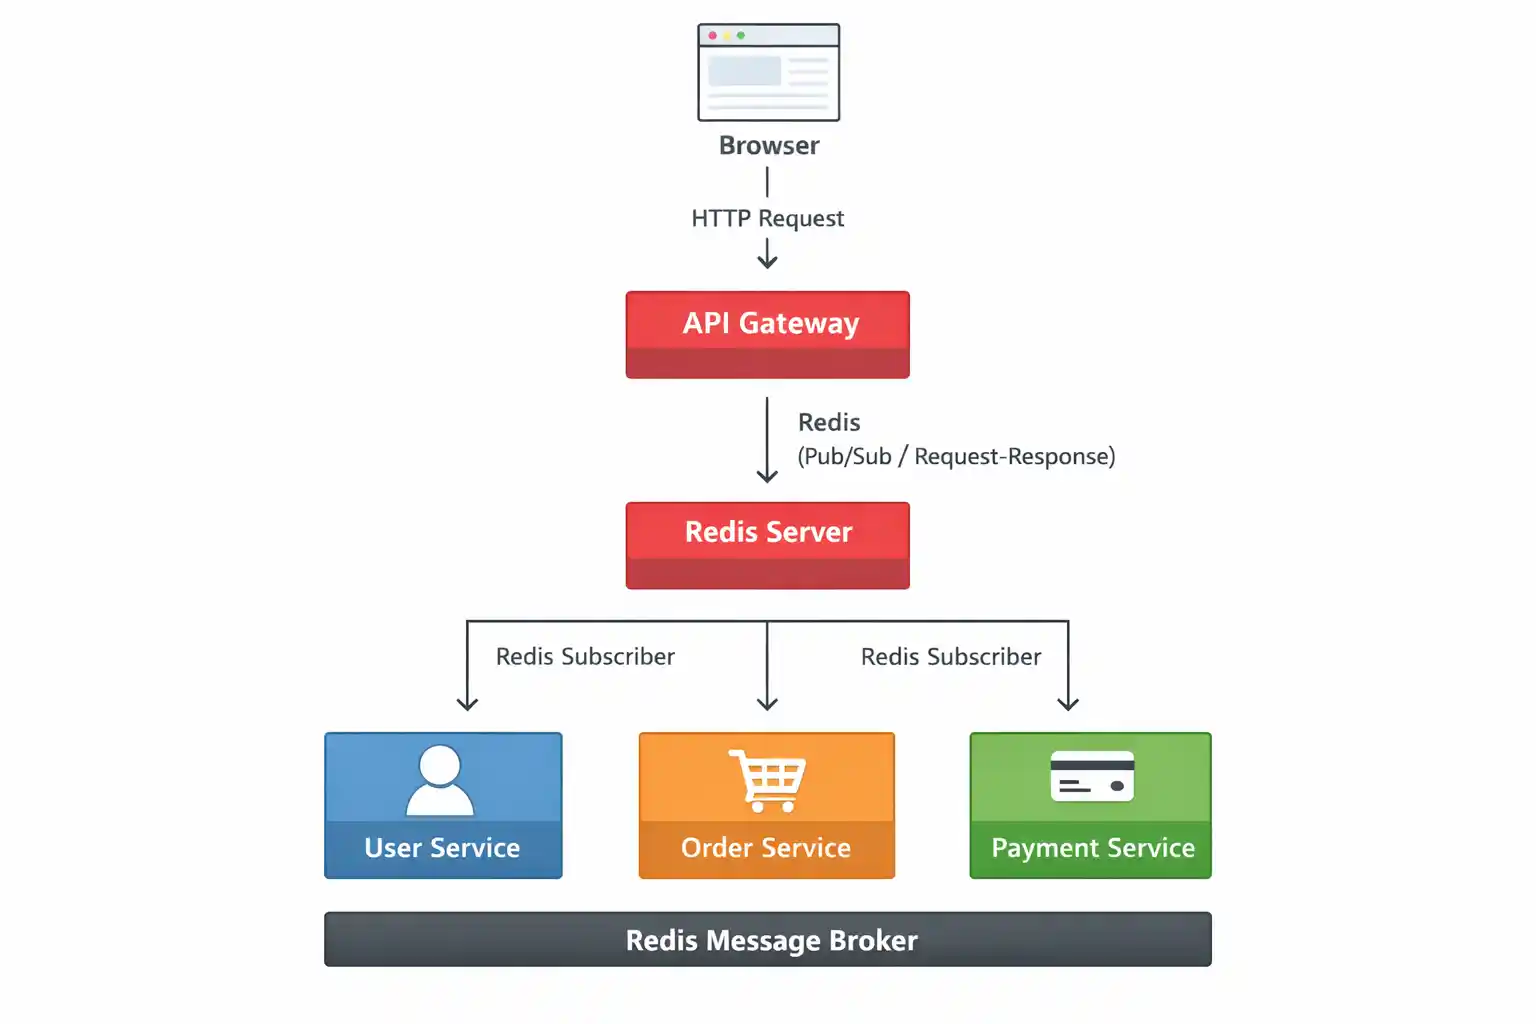
In this tutorial, we will create four NestJS microservices that communicate via Redis:
User Service – Manages user-related operations
Order Service – Handles order creation and management
Payment Service – Processes payments and transactions
API Gateway – Acts as a single entry point for client requests
Redis will serve as the message broker, enabling both request–response and event-driven Pub/Sub communication between services.
Architecture Overview (Redis)
Prerequisites
Node.js installed
NestJS CLI installed
Redis installed locally (no Docker required)
Step 1: Install NestJS CLI
npm i -g @nestjs/cli
Choose npm or yarn and enable TypeScript.
Step 2: Create NestJS Applications
3 Microservices
API Gateway – Client
Create four separate projects:
#1 nest new user-service
#2 nest new order-service
#3 nest new payment-service
#4 nest new api-gateway
Now we have 4 independent services (true microservices).
Step 3: Install Redis Dependencies
Run this in ALL four projects:
npm install @nestjs/microservices ioredis
Step 4: Install & Run Redis (Without Docker – Windows Friendly)
Redis does not officially support native Windows installers anymore, but a stable, production-tested Windows build is available and widely used for development.
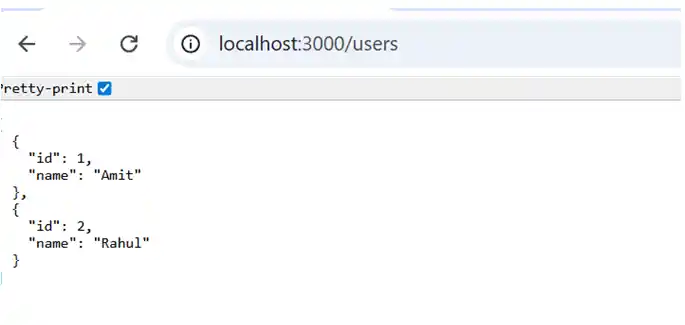
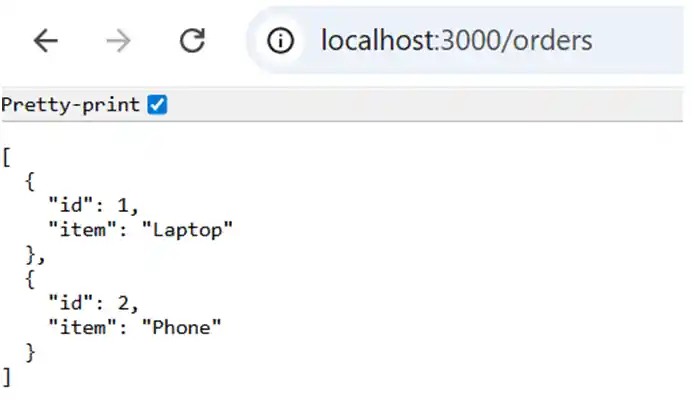
Now you will see data coming from the microservice, like
#1 For User
#2 For Orders
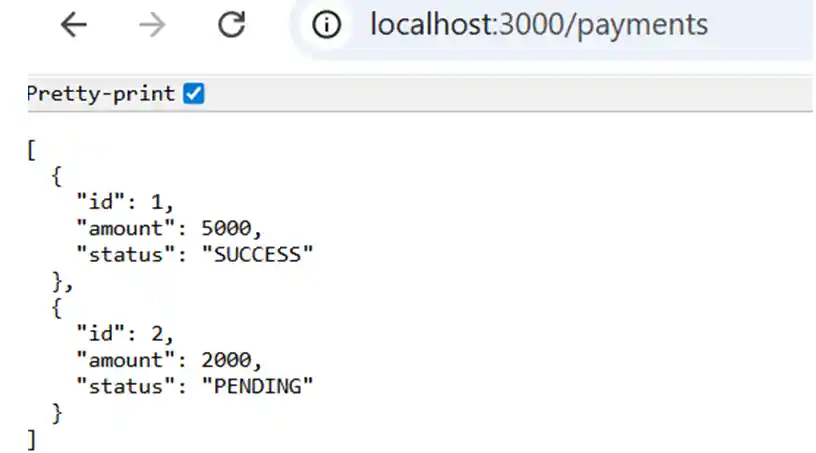
#3 For Payments
What Happens If One Service Stops?
Stop Order Service
Users & Payments still work
Redis stays running
No system crash
Loose coupling achieved
Redis vs Kafka vs gRPC: Comparison for Microservices
When choosing a communication method for your NestJS microservices, it’s important to understand the strengths and limitations of Redis, Kafka, and gRPC. Below is a comparison based on common features and real-world usage.
When deploying microservices using these communication methods, there are practical considerations:
Redis
❌ Platforms like Vercel or Netlify do not support long-running Redis listeners.
✅ Recommended platforms: AWS EC2, DigitalOcean, Railway, Render, Fly.io, or any environment that supports persistent background processes.
Kafka
Requires a running Kafka cluster, either self-hosted or via managed services like Confluent Cloud or AWS MSK.
gRPC
Can be deployed like any standard HTTP/2 service, but requires network visibility between services.
Summary
Use Case
Recommended Communication
Lightweight, fast message queue
Redis
Event streaming, analytics, high-volume messaging
Kakfa
Synchronous API calls with strong typing
gRPC
Choosing the right communication layer depends on service requirements, scale, and deployment constraints. Often, real-world systems use a combination of these technologies:
Get in touch with Prishusoft – your trusted partner for custom software development. Whether you need a powerful web application or a sleek mobile app, our expert team is here to turn your ideas into reality.